17th April 2020 8:00 am
Brighten up your home with some 3D paper flowers that your children can make themselves (with some adult support). All you will need are some coloured pieces of paper, scissors, glue, and either some drinking straws or a bit of clear tape.
1. Choose whichever colour paper you’d like to use for the petals (feel free to mix and match with lots of different colours – even wrapping paper will work to give you patterned petals). Cut the paper in half lengthways.
2. Support your child to cut strips from the paper.
3. Get your child to glue the two ends together for each paper strip, so that the top forms a loop. Your petals are now ready.
4. While the petals take a moment to dry, choose another colour paper and cut two matching circles for the flower centre.
5. Now get your child to glue the flat ends of the petal loops to the centre of one of the circles.
6. When all the petals have been glued down, flatten the end of a straw and glue that to the centre of the circle as well. This will be the flower stem. If you don’t have any straws, tightly roll up some more coloured paper and use a bit of tape to hold it together.
7. Lastly, glue the second circle onto the flower centre to cover up all of the ends of the petals and stem.
Make a bunch of different coloured flowers with your child and put them in a vase to display!
Check out the video below from Retouch Paper & Crafts to see these instructions step-by-step.
15th April 2020 8:00 am
Draw the outline of a fish for your child or print this one from supercoloring.com. Then set your child up with a few different colours of paint and some celery sticks. Show them how to dip the end of the celery into the paint and press it to the paper to make a fish scale.
We do lots of printing with different types of vegetables at Pippins, so this is an activity your child may already be familiar with.
While your child creates their fishy masterpiece, visit mom.com for a kid-friendly explanation of what fish scales are and why fish have them.

Photo courtesy of Crafty Morning.
14th April 2020 8:00 am
Don’t throw your empty tissue boxes into the recycling just yet – turn them into monster feet… or dinosaur feet, giant feet, robot feet, astronaut feet. Let your child decorate their feet with whatever craft materials you have available, and help them glue on some claws (cut pieces of paper, felt, or sponges for these). This craft would be a great aid to some imaginative play.
Photo courtesy of PBS.
11th April 2020 8:00 am
Start your engines future pilots! Help your children fold (and decorate!) some paper aeroplanes. Paper aeroplanes have been a huge children’s favourite for the last few months at Pippins. Check out Fold ‘N Fly for some easy paper aeroplane design instructions and step-by-step videos.
Then, find a large sheet of paper, a sheet of newspaper, or tape several sheets of A4 paper together. Cut holes of various sizes in the paper, and label each hole with a points-value if you want to keep score. Hang the paper up in a doorway, just like in the below photo from Sewing Mama Raeanna.
Now let the games begin. Your children can take turns trying to throw their aeroplanes through the holes, and seeing who can wrack up more points.
11th April 2020 8:00 am
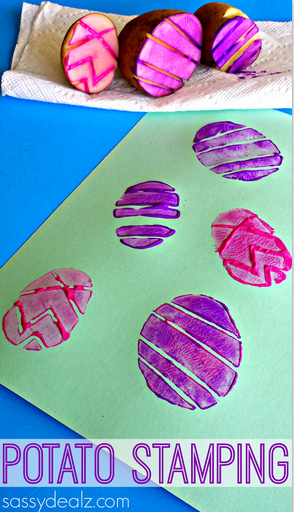
Do you have any potatoes that are going off? Cut them up for your child to do this fun Easter craft. Potato stamping will be a familiar activity for many Pippins’ children; using the potatoes to make Easter egg prints gives this idea a fun holiday twist. Besides the simple egg shapes, feel free to get creative with bunnies, sheep, or anything else you can think of! Visit CraftyMorning.com for full instructions.

10th April 2020 8:00 am
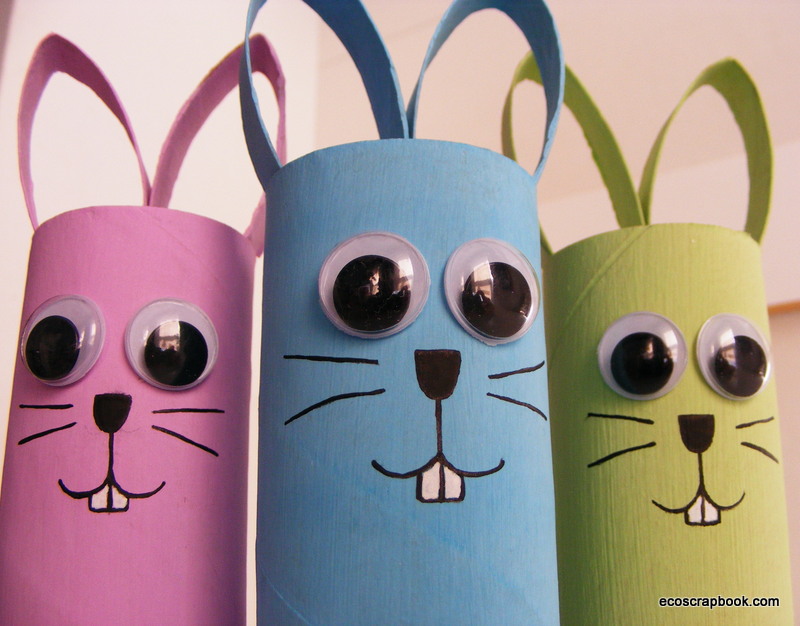
The Easter Bunny may be social distancing this year so – just to be on the safe side – it might be best for your child to make their own Easter bunny! You will need the empty cardboard tube from a roll of loo roll, scissors, some paint, a cotton ball, and some glue or tape. Additionally, you may want to use some googly eyes, a black permanent marker and some Tipp-Ex.
1. Start by cutting 2 rounds off the top of the cardboard tube, each about 2cm wide.
2. Squash these rounds slightly, so they come to a point at one end. Then, cut the opposite end open.
3. Tape or glue the rounds into the top of the cardboard tube, to form bunny ears. See the photo below from EcoScrapbook.
4. Now it’s time to turn things over to your child so that they can paint their bunny. Feel free to get creative with glitter, stickers, or anything else you can think of!
5. Once your bunny is dry, paint on the eyes and face, or use a black marker and some Tipp-Ex to draw on the nose, mouth, whiskers and teeth.
6. Lastly, have your child glue a cotton ball onto the back of the cardboard tube for your bunny’s tail.
9th April 2020 8:00 am
Try this easy art project in preparation for Easter this Sunday. All you need are some pieces of cardboard or heavy paper to cut out your egg shapes, lots of scraps of colourful paper or wrapping paper for your kids to tear up, some glue, a hole punch, and a bit of ribbon or string for hanging your creations. Visit Clare’s Craftroom for instructions.
8th April 2020 8:00 am
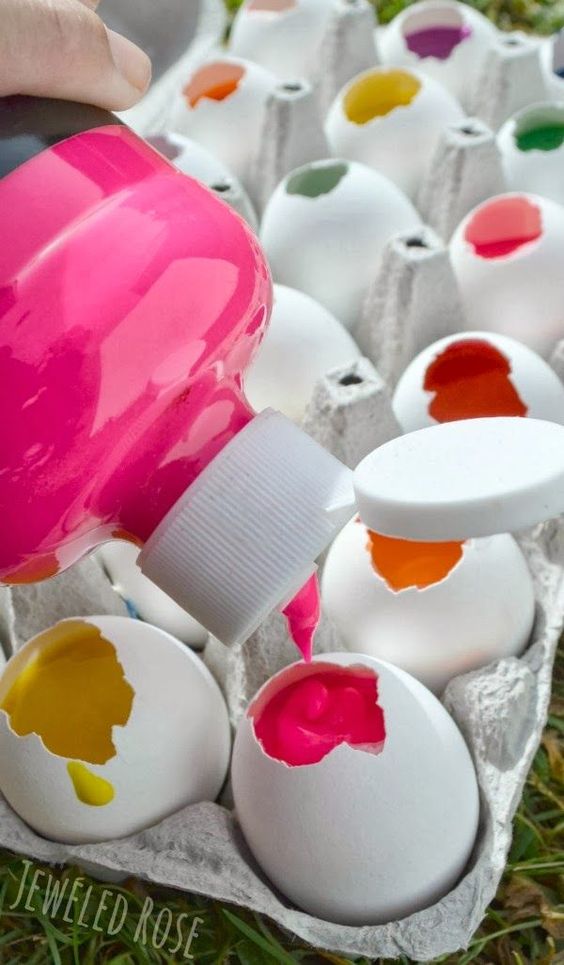
Feeling cooped up at home? Let your children take out their frustrations on this cracking activity.
When you use eggs, be careful to crack them by hitting them on the point, rather than cracking them down the middle. Rinse out the shells and save them up. When you think you have enough empty shells, it’s time to head out into the garden with your kids. Fill each shell with paint (or even coloured water, ketchup, juice… feel free to get creative with liquids). Prop up a large sheet of paper or piece of cardboard against a fence, wall, easel, box, etc. and let your children take turns throwing the eggs against the paper/cardboard as hard as they can. Watch what happens to the paint as the eggs smash! Get your kids to talk about what happens to the different colours as they mix together on the paper.
For younger children, it may be easier to put the paper flat on the ground, have your child stand on a chair above it and drop the eggs. They’re more likely to accurately hit the paper with this method, and gravity will help with the force needed to break the eggs.
Photo courtesy of Growing a Jeweled Rose.
Photo courtesy of Made for Mums.
7th April 2020 8:00 am
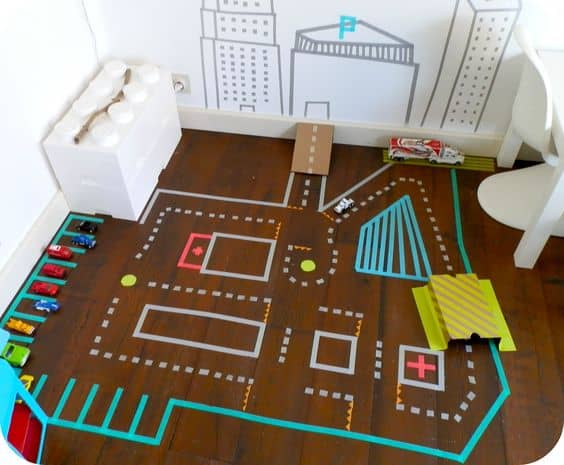
Do you have some electrical tape sitting in the bottom of a tool box somewhere? Or maybe some masking tape instead? Dig them out and help your children design a city on the floor – or even up the walls! Help your children learn to cut the tape themselves by sticking one end to the edge of a table, unrolling just the bit that they need, and then cut. Add small pieces of cardboard to your design for bridges, tunnels and ramps.
This project would work well as a city for small cars, a zoo for toy animals, a coral reef for pretend fish – whatever your imaginations can dream up!
Photo courtesy of Raising Twins.
Photo courtesy of A Girl and a Glue Gun.
7th April 2020 8:00 am
Do you have a little kitchen helper in the house? Visit Primary Playground to download and print this chef’s hat that your child can colour and wear.